Getting Started with Box Cloud Connector
View some of the Frequently Asked Questions to our support staff. Included are some tips and tricks making this forum ideal for users getting started with GoAnywhere MFT. Note: Users can reply to existing topics but only our support staff can add new topics to this forum.
1 post
Page 1 of 1
-
Site Admin

- Posts: 43
- Joined: Wed Jun 21, 2017 8:12 am
The Box Cloud Connector allows you to integrate the Box API user and service accounts with
GoAnywhere to upload and download files, create and delete directories, and other Box file
system tasks. GoAnywhere's Box Connector uses JSON Web Tokens (JWT) to authenticate with
Box. Before you can begin using the Box Cloud Connector with JWT, you must follow all the
prerequisites from Box.com's developer website:
https://developer.box.com/docs/setting-up-a-jwt-app
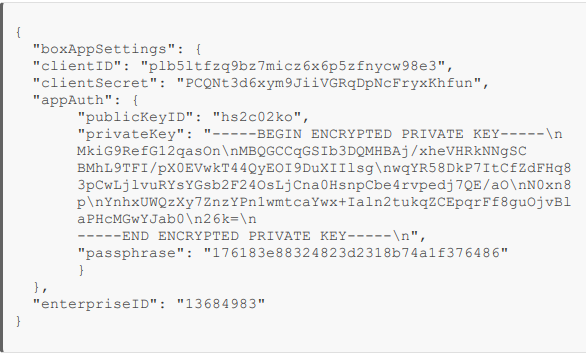
After you complete Step 2: Generate Public / Private Key Pair from the developer page, a
config JSON file will download to your desktop. This config file contains all the field definitions
and the private key required for integrating and authenticating Box with GoAnywhere.
Example Box Config JSON File:
 Once you have the config file, you must complete the next four steps:
Step 1: Import the Private Key
The Private Key and Passphrase required for JWT authentication is located within Box's config
JSON file in the privateKey and passPhrase fields. This key must be imported into
GoAnywhere's Key Management System.
Follow the instructions to extract and import the key:
Follow the instructions on the Cloud Connector Resource topic to add a Box Cloud Connector.
On the Box Cloud Connector, specify the following fields:
 Click the Save button to save the Box Cloud Connector Resource.
Step 4: Configure the GoAnywhere Project
Box Cloud Connector actions are added to a Project like other file transfer tasks. Use the
following instructions to use a Box Cloud connector action in a Project workflow.
GoAnywhere to upload and download files, create and delete directories, and other Box file
system tasks. GoAnywhere's Box Connector uses JSON Web Tokens (JWT) to authenticate with
Box. Before you can begin using the Box Cloud Connector with JWT, you must follow all the
prerequisites from Box.com's developer website:
https://developer.box.com/docs/setting-up-a-jwt-app
After you complete Step 2: Generate Public / Private Key Pair from the developer page, a
config JSON file will download to your desktop. This config file contains all the field definitions
and the private key required for integrating and authenticating Box with GoAnywhere.
Example Box Config JSON File:
JSON pic.PNG (55.67 KiB) Viewed 8123 times
Step 1: Import the Private Key
The Private Key and Passphrase required for JWT authentication is located within Box's config
JSON file in the privateKey and passPhrase fields. This key must be imported into
GoAnywhere's Key Management System.
Follow the instructions to extract and import the key:
- 1.Copy the contents of the privateKey field from the JSON file to a new text file. Remove
the new line characters (\n) from the file and replace them with line feeds. Save the file with a .key extension.
- 2. Note the passphrase field that is included in the JSON file. This will be used to import the
key file into GoAnywhere's KMS SSH Key Manager in the Key Password field.
- 3. Follow the instructions in the GoAnywhere MFT User Guide to import the key file into
GoAnywhere's KMS SSH Key Manager. When you import the key, note the Key Vault,
Key Name, and optional Key Password. This will be used in Step 3 below.
- 1. Log in as an Admin User with the Product Administrator role.
- 2. From the main menu bar, select System and then click the Cloud Connectors link.
- 3. On the Cloud Connector page, click Add Cloud Connector on the page toolbar.
- 4. Identify the Cloud Connector you wish to install. You can also search for a Cloud Connector using a keyword search.
- 5. Click the Install or Free Trial button to download and install a Cloud Connector.
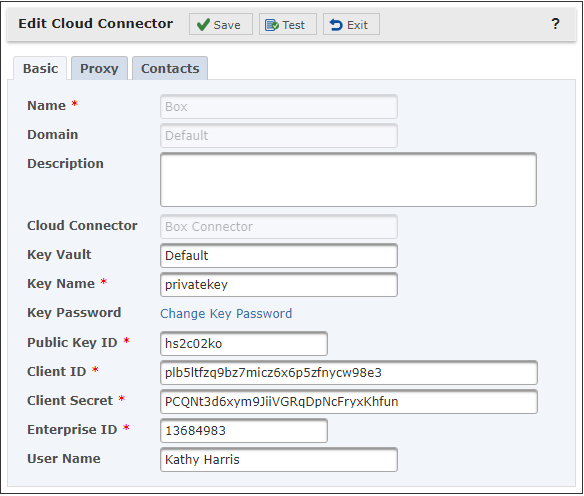
Follow the instructions on the Cloud Connector Resource topic to add a Box Cloud Connector.
On the Box Cloud Connector, specify the following fields:
- Name - The name of the Box Cloud Connector resource.
- l Description - An optional description to describe the resource.
- l Key Vault - The name of the Key Vault where you imported the key file.
- l Key Name - The name of the key that you provided to GoAnywhere when you imported
the privatekey.key file into the KMS.
- l Key Password - The passphrase of the key that you provided to GoAnywhere when you
imported the privatekey.key file into the KMS.
- l Public Key ID - The publicKeyID from the Box config JSON file.
- l Client ID - The clientID from the Box config JSON file.
- l Client Secret - The clientSecret from the Box config JSON file.
- l Enterprise ID - The enterpriseID from the Box config JSON file.
- l User Name - A Box managed user account that is used to perform actions in GoAnywhere.
- When this field is left blank, the Box service account is used.
edit cloud connecor.PNG (21.69 KiB) Viewed 8123 times
Step 4: Configure the GoAnywhere Project
Box Cloud Connector actions are added to a Project like other file transfer tasks. Use the
following instructions to use a Box Cloud connector action in a Project workflow.
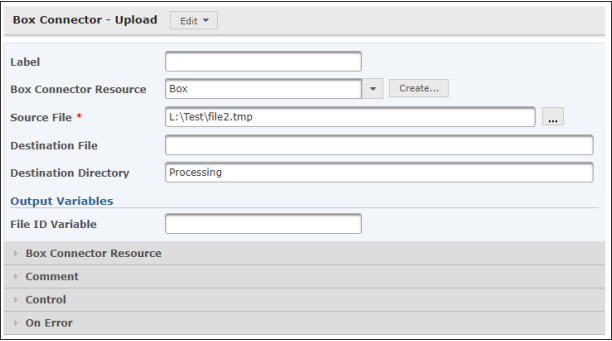
- 1. From within the Project Designer page, expand the Cloud Connectors folder in the
Component Library, expand the Box Connector menu, and then drag an action to the
Project Outline
- 2. On the action, specify a value for the Box Connector:
l Box Connector - A pre-configured Box Connector server from the drop-down list
- 3. Specify any additional fields for the action. In the following example, the Upload action is
used to upload a file to Box.
Upload task.PNG (30.68 KiB) Viewed 8123 times
- 4. Click the Save button when finished.
Philip Horn
Senior Support Analyst
e. [email protected]
p. 1-800-949-4696
w. GoAnywhere.com | HelpSystems.com
Senior Support Analyst
e. [email protected]
p. 1-800-949-4696
w. GoAnywhere.com | HelpSystems.com
1 post
Page 1 of 1
