Using the SQL Wizard/Joining Tables
View some of the Frequently Asked Questions to our support staff. Included are some tips and tricks making this forum ideal for users getting started with GoAnywhere MFT. Note: Users can reply to existing topics but only our support staff can add new topics to this forum.
1 post
Page 1 of 1
-
Site Admin

- Posts: 43
- Joined: Wed Jun 21, 2017 8:12 am
The SQL Wizard in GoAnywhere MFT allows users to quickly build SQL SELECT statements for retrieving data from a database without having knowledge of the SQL syntax. This intuitive interface allows a user to choose a database server, select a schema (library), tables, columns, order by, where and join criteria for the SQL statement.
The resulting SELECT statement can be tested and embedded within a Project for future execution.
Using the Project Designer's SQL Wizard
To access the SQL Wizard for building a SELECT statement, click the browse icon on the right side of the SQL Statement field.
 Based on the Database Resource you are working with, the Schemas tab will populate the schemas or libraries (that contain the tables) you want to work with. To select schemas, click the checkboxes next to the schemas you want and click the right arrow button. The selected schemas will move to the right side of the page.
Click the tab labeled Tables. Use the arrow icons to move the desired tables from the Available Tables section to the Selected Tables section. This example uses the ‘customers’ and ‘orders’ tables.
 Viewed 7307 times") Click the tab labeled Columns. A list of all columns (fields) in the selected table(s) will be shown on the left side of the page. From this page, you can choose the columns (fields) for the SELECT statement. In this example, all available columns from both tables are selected.
Click the tab labeled Columns. A list of all columns (fields) in the selected table(s) will be shown on the left side of the page. From this page, you can choose the columns (fields) for the SELECT statement. In this example, all available columns from both tables are selected.
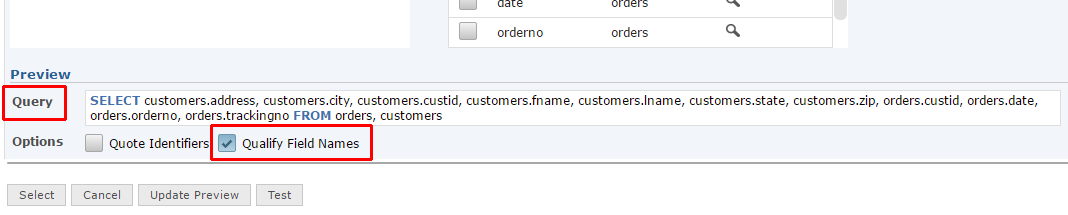
 Viewed 7307 times") When working with two tables that share some column names, select the option “Qualify Field Names”. Looking at the Query statement, it is now clear which tables the columns are being selected from.
When working with two tables that share some column names, select the option “Qualify Field Names”. Looking at the Query statement, it is now clear which tables the columns are being selected from.
 Click the tab labeled Join. The Join page allows you to specify the criteria on how the tables should be joined together. In this example, we will join the queried data based on Customer ID. By selecting INNER JOIN, the results will contain any rows (records) from the two joined tables with matching ‘custid’ values. All other rows will be excluded from the results.
 Viewed 7307 times") When you are done specifying the criteria for the SELECT statement, you can test the SELECT statement by clicking the Test button. This will run the statement against the database and will show the results of the SELECT statement (displaying the first few selected rows). This feature will help you verify that the SELECT statement is generating the results that you expected.
When you are done specifying the criteria for the SELECT statement, you can test the SELECT statement by clicking the Test button. This will run the statement against the database and will show the results of the SELECT statement (displaying the first few selected rows). This feature will help you verify that the SELECT statement is generating the results that you expected.
 Viewed 7307 times") When finished, click the Select button to return to the Project Designer.
When finished, click the Select button to return to the Project Designer.
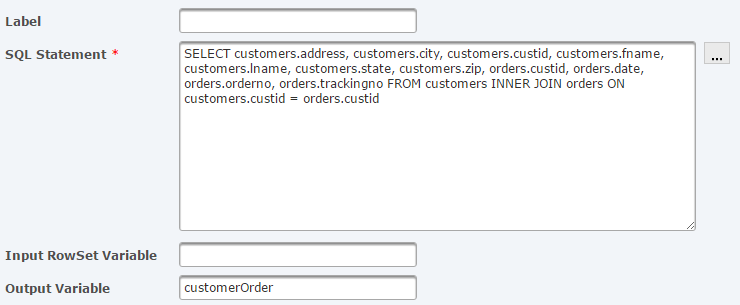
The following image represents the generated SQL Statement.
The resulting SELECT statement can be tested and embedded within a Project for future execution.
Using the Project Designer's SQL Wizard
To access the SQL Wizard for building a SELECT statement, click the browse icon on the right side of the SQL Statement field.
QueryWizard.png (23.26 KiB) Viewed 7307 times
Click the tab labeled Tables. Use the arrow icons to move the desired tables from the Available Tables section to the Selected Tables section. This example uses the ‘customers’ and ‘orders’ tables.
WizardColumns2.png (28.17 KiB) Viewed 7307 times
The following image represents the generated SQL Statement.
SQLstatement6.png (13.83 KiB) Viewed 7307 times
Attachments
 Viewed 7307 times")
Philip Horn
Senior Support Analyst
e. [email protected]
p. 1-800-949-4696
w. GoAnywhere.com | HelpSystems.com
Senior Support Analyst
e. [email protected]
p. 1-800-949-4696
w. GoAnywhere.com | HelpSystems.com
1 post
Page 1 of 1
